Achieve Perfect Smoked Tri Tip: Low and Slow with a Fiery Finish
Imagine a succulent cut of beef, so incredibly tender it practically melts in your mouth, infused with deep, aromatic smoke, and sporting a tantalizing, caramelized crust. This isn't just a dream – it's the reality of perfectly
smoked tri tip. Often hailed as a show-stopping centerpiece, this versatile and surprisingly budget-friendly roast offers an unparalleled culinary experience that will impress even the most discerning palates. The secret lies in a masterful technique: embracing the "low and slow" method to achieve unparalleled tenderness and juiciness, followed by a "fiery finish" that locks in flavor and delivers an irresistible textural contrast. Get ready to transform a simple cut of beef into an unforgettable feast.
Unveiling the Tri Tip: A Cut Above the Rest
Before we delve into the smoking process, let's get acquainted with our star ingredient: the tri tip. This distinctively triangular cut hails from the lower part of the bottom sirloin, a region known for delivering robust beef flavor without compromising on tenderness when prepared correctly. While historically a beloved staple in Western American barbecue – particularly in California, where it's practically legendary – the tri tip's popularity is rapidly spreading across the nation, making it more accessible to home cooks everywhere.
Typically, you'll find tri tip roasts weighing between 2-3 pounds when trimmed by your butcher. These trimmed cuts are ready for seasoning and smoking with minimal fuss. However, you might occasionally come across untrimmed versions, which can weigh up to 5 pounds and feature a more substantial fat cap and a layer of silver skin. While untrimmed roasts require a bit more preparation (trimming the excess fat and silver skin is crucial for even cooking and rub adhesion), they can sometimes be more economical and allow you to customize the fat layer to your preference. Regardless of whether you choose trimmed or untrimmed, the tri tip’s inherent beefiness and ability to become incredibly tender make it an ideal candidate for the smoker, promising a delicious, juicy result that cooks beautifully pink from edge to edge.
The Art of Flavor: Seasoning Your Tri Tip for Success
The journey to an extraordinary
smoked tri tip begins long before it hits the grates. Seasoning is the foundational step that builds the flavor profile, and it’s one you absolutely shouldn’t skip. For those embarking on their first tri tip adventure, simplicity often yields the best results. A classic blend of **kosher salt, fresh ground black pepper, and garlic powder** applied liberally to all sides of the roast provides a fantastic starting point. This straightforward trifecta enhances the beef's natural flavor without overpowering it.
However, don't be afraid to experiment and personalize your rub. Many pitmasters enjoy adding a touch of **paprika** for color and a subtle sweetness, **onion powder** for an extra layer of savory depth, or a pinch of **cayenne pepper** for a gentle kick. Pre-made beef rubs are also an excellent option if you're short on time or looking for a professional-grade blend. Before applying your chosen rub, consider a binder. A thin layer of **yellow mustard** or a drizzle of **olive oil** can help the seasoning adhere better to the meat, creating a more uniform crust. Once seasoned, allow the tri tip to rest at room temperature for 30-60 minutes, or even better, refrigerate it for a few hours (or overnight) to allow the flavors to penetrate deeper into the meat. This crucial step contributes significantly to the overall deliciousness and complexity of your final dish.
Low and Slow: The Heart of Perfect Smoked Tri Tip
The core philosophy behind achieving a truly tender and juicy smoked tri tip lies in the "low and slow" cooking method. This involves cooking the meat at a consistent, moderate temperature for an extended period, allowing connective tissues to break down gently and moisture to be retained.
Your smoker set-up is paramount here. Whether you're using a pellet grill, an offset smoker, or an electric model, maintaining a steady internal temperature of **225°F (107°C)** is critical. This temperature is low enough to gently cook the meat, preventing the exterior from drying out, while also allowing the magical process of smoke penetration.
**Wood Choice Matters:** The type of wood you use for smoking will significantly influence the final flavor.
- Hickory: A classic choice, offering a strong, bacon-like flavor.
- Oak: A medium, balanced smoke flavor that pairs well with beef.
- Cherry or Apple: Provide a milder, slightly sweet, fruity smoke, adding a beautiful reddish hue to the meat.
- Pecan: Offers a richer, nutty smoke, often described as a milder version of hickory.
Experiment with different woods to discover your preferred profile, but for a first timer, oak or hickory are reliable choices.
Place your seasoned tri tip directly on the grates, ideally with an internal probe thermometer inserted into the thickest part of the meat (avoiding any bone or large pockets of fat). This thermometer is your best friend, as cook times can vary based on the size and thickness of your roast. For a medium-rare finish, you'll want to pull the tri tip off the smoker when its internal temperature reaches **5-10 degrees below your final target**. This pre-emptive removal accounts for "carryover cooking," where the internal temperature continues to rise even after the meat is off the heat.
For a general guide, expect the smoking phase to take approximately 1 to 2 hours for a typical 2-3 pound tri tip. Here’s a quick reference for desired doneness:
| Doneness |
Pull Temp (from Smoker) |
Final Temp (after Rest) |
| Rare |
120-125°F (49-52°C) |
125-130°F (52-54°C) |
| Medium-Rare |
125-130°F (52-54°C) |
130-135°F (54-57°C) |
| Medium |
135-140°F (57-60°C) |
140-145°F (60-63°C) |
Remember, patience is a virtue in smoking. Resist the urge to constantly open the smoker, as this leads to temperature fluctuations and extends cooking time. Trust your thermometer, and let the smoke do its magic.
The Fiery Finish: Searing for That Irresistible Crust
Once your tri tip has reached its target internal temperature from the low and slow smoke, it's time for the "fiery finish" – a high-heat sear that takes your roast from good to absolutely phenomenal. This step is crucial for two main reasons:
- **The Maillard Reaction:** The intense heat causes sugars and amino acids on the surface of the meat to react, creating hundreds of new flavor compounds and that coveted rich, dark, flavorful crust.
- **Textural Contrast:** It adds a delightful crispy exterior that perfectly complements the tender, juicy interior.
Immediately after removing the tri tip from the smoker, crank up your grill (gas, charcoal, or even a cast iron pan on high heat) to its highest setting. You're aiming for extreme heat, ideally over 500°F (260°C). Place the tri tip directly over the searing hot grates or in the smoking-hot pan. Sear for 2-3 minutes per side, rotating frequently to ensure an even crust across the entire surface. Watch carefully to avoid burning, as the surface can go from perfectly seared to charred in seconds. The goal is a beautiful, dark mahogany color with a slight crispness. This entire searing process should only take about 5-6 minutes.
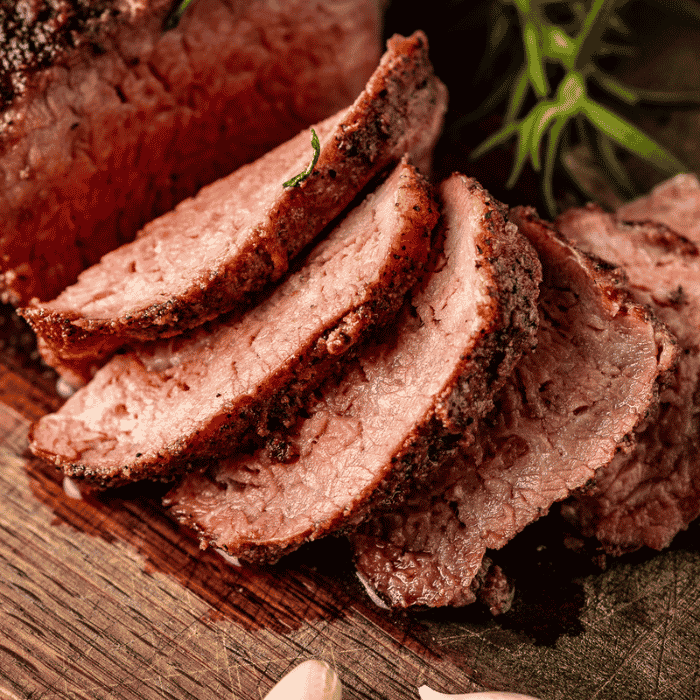
The Final Touches: Resting and Slicing for Ultimate Tenderness
You've put in the effort, and now comes one of the most critical, yet often overlooked, steps: resting the meat. Once seared, tent your tri tip loosely with foil and let it rest on a cutting board for at least **15-20 minutes**. Do not skip this! Resting allows the muscle fibers, which have contracted during cooking, to relax and reabsorb the juices that have migrated to the center of the roast. Cutting into it too soon will result in those precious, flavorful juices spilling out onto your cutting board instead of remaining within the meat where they belong, leaving you with a drier, less flavorful experience.
After resting, the final step to unlock maximum tenderness is slicing correctly. The tri tip is unique in that it has **two distinct grain directions**. To ensure every bite is tender, you must slice *against the grain*.
- Identify the point where the grain changes direction (usually about halfway through the roast).
- Cut the tri tip in half at this point.
- Now, slice each half individually, ensuring your knife blade is perpendicular to the muscle fibers.
Thin slices, about 1/4-inch thick, are generally preferred for optimal tenderness and enjoyment.
Serving & Enjoying Your Masterpiece
Your perfectly
smoked tri tip is now ready to shine as a show-stopping centerpiece. Its versatility means it pairs wonderfully with a myriad of sides, from classic barbecue staples like creamy coleslaw, baked beans, and potato salad, to more refined options like roasted asparagus or a fresh garden salad.
But the enjoyment doesn't stop at dinner! Smoked tri tip makes for incredible leftovers. Thinly sliced, it's fantastic in sandwiches, perfect for steak tacos, or adds a hearty protein boost to salads. Its rich, smoky flavor deepens overnight, often tasting even better the next day.
Conclusion
Mastering smoked tri tip is a rewarding journey that elevates your barbecue skills and delights everyone at your table. By understanding the unique characteristics of this cut, applying a thoughtful seasoning, embracing the low and slow smoke, and perfecting that fiery sear, you'll consistently achieve a roast that's incredibly tender, wonderfully juicy, and bursting with smoky flavor. So, fire up your smoker, gather your favorite sides, and prepare to impress with this truly exceptional cut of beef. Happy smoking!